5 Best Binoculars for Stargazing (October 2026)
The best binoculars for stargazing include the Celestron SkyMaster 15x70 for first tripod setups, the Celestron SkyMaster 25x70 for closer lunar views, and the Celestron SkyMaster 20x80 for dedicated backyard sessions.
On this page (7 sections)
- Which best binoculars for stargazing fit your plans?
- How do you choose binoculars for stargazing?
- What can you realistically see with astronomy binoculars?
- How do you set up astronomy binoculars for a comfortable view?
- Which common mistakes make stargazing harder?
- How do you protect binoculars from dew and dirt?
- Which best binoculars for stargazing should you buy?
The Celestron SkyMaster 15x70 is our top pick among the best binoculars for stargazing if you'll use a tripod. For beginners who want to step outside and scan the sky by hand, the Celestron Cometron 7x50 is the better fit.
Your first decision is how you'll observe. A mounted pair suits planned sessions on selected targets, while a lower-power handheld pair makes it easier to learn constellations and explore broad sky areas.
If you're new to the numbers, read our guide to what binocular magnification and objective size mean. Our broader binoculars guide covers choices for other outdoor uses.
Our picks at a glance
-
1

-
2

-
3

Which best binoculars for stargazing fit your plans?
Choose the SkyMaster 15x70 for a first mounted setup, the Cometron for handheld exploring, and the larger SkyMaster for planned backyard sessions. The highest-power option suits closer looks at known targets, rather than learning the sky from scratch.
AtticAlmanac compared magnification, aperture, field of view, eye relief, and support needs. The order reflects astronomy use overall, so the top-ranked model won't be the right choice for someone who wants to leave the tripod indoors.
Celestron SkyMaster 15x70: Best for first tripod setups
- 15x magnification
- 70 mm objective lenses
- BaK-4 prisms
- Included tripod adapter
A practical starting point for mounted astronomy, with more sky coverage than the higher-power SkyMaster models here. Choose it if you plan to observe from a fixed spot.
Pros
- BaK-4 prisms and multi-coated optics
- Tripod adapter included
- 18 mm eye relief
Cons
- Needs support for comfortable extended viewing
- Tripod not included
The Celestron SkyMaster 15x70 offers the most useful middle ground among the mounted options here. Its 4.4-degree field gives you more room to find and frame targets than the other SkyMaster models in this group.
That matters when you're moving between a sky chart and the eyepieces. A little more surrounding sky helps you recognize patterns instead of losing your place each time you shift the mount.
The combination of BaK-4 prisms and multi-coated optics suits night viewing, while the included adapter removes one item from your setup checklist. You'll still need a suitable photo tripod and head.
Its 18 mm eye relief also makes it worth considering if you wear glasses. Fold-down eyecups let you move closer, though the full view still depends on how your glasses fit.
Buy this pair if you want to spend time on a target rather than sweep the whole sky in one motion. Skip it if your usual session will be a few minutes outside without any support equipment.
Celestron SkyMaster 25x70: Best for closer lunar views
- 25x magnification
- 70 mm objective lenses
- BaK-4 prisms
- Included tripod adapter
The highest power in this group suits mounted observations of the Moon and smaller targets. Its narrow field makes finding objects less forgiving.
Pros
- Highest magnification in this group
- Tripod adapter included
- Multi-coated optics
Cons
- Narrow 2.7-degree field of view
- 13 mm eye relief can limit use with glasses
The Celestron SkyMaster 25x70 suits observers who already know where they want to look. Its extra power makes lunar features larger, but the 2.7-degree field leaves less surrounding sky to guide you.
This is a deliberate trade: you gain image scale while giving up some ease of finding objects. Small mount movements become more noticeable, so a smooth tripod head matters as much as keeping the legs still.
The same objective diameter as the first pick doesn't mean the same viewing experience. More magnification produces a smaller exit pupil, making this a less natural choice for relaxed sweeps of broad, faint sky areas.
Its 13 mm eye relief is another reason for glasses wearers to be cautious. Fold-down eyecups help with positioning, but they don't create extra space between your eye and the eyepiece.
Choose it for supported observations of the Moon and smaller targets. Skip it if you're still learning star patterns, need easy handheld use, or want the widest possible view.
Celestron SkyMaster 20x80: Best for dedicated backyard sessions
- 20x magnification
- 80 mm objective lenses
- BaK-4 prisms
- Integrated tripod adapter
Large objectives suit planned sessions focused on star fields and deep-sky targets. Its weight calls for a stable mount and a convenient observing spot.
Pros
- Joint-largest objectives in this group
- Integrated tripod adapter
- 18 mm eye relief
Cons
- Heaviest pick here
- Requires a sturdy support setup
The Celestron SkyMaster 20x80 is the better fit for a regular observing spot where carrying equipment is a small part of the evening. Its larger objectives favor buyers who want to devote a mount to astronomy.
The integrated tripod adapter and reinforced body suit that role. Treat this as a setup you assemble for a session, rather than a pair you hold to your eyes while standing in the yard.
Its 3.7-degree field offers more sky coverage than the higher-power SkyMaster above. That gives you more context around a target while still providing a larger image than the first pick.
The main cost in convenience is weight. At 4.8 lb before adding support equipment, it asks more of your tripod head and makes frequent moves between observing spots less appealing.
Buy it if you have a stable mount, a clear viewing area, and time for longer sessions. Skip it for walking trips or quick looks between clouds, where the effort of carrying and setting up could outweigh the benefit.
Celestron Cometron 7x50: Best for learning the sky
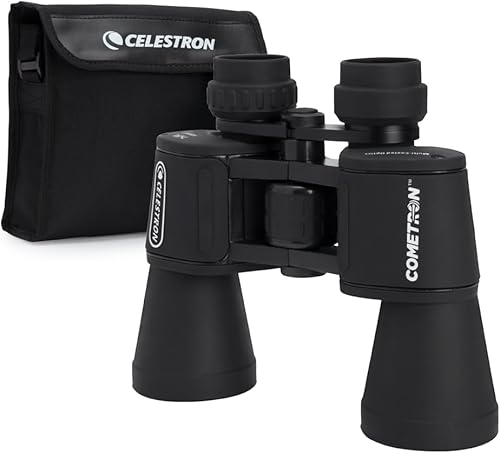
- 7x magnification
- 50 mm objective lenses
- Wide field of view
- Tripod-adaptable
The best match here for broad handheld views and short sessions without a mount. Lower power helps you connect what you see through the binoculars with the surrounding sky.
Pros
- Wide field for finding targets
- Lightest pick in this group
- Useful for daytime viewing too
Cons
- Less reach for small targets
- Tripod adapter not included
The Celestron Cometron 7x50 is the most sensible first choice here if you don't want a tripod. Lower power makes hand movement less distracting and leaves more sky visible around the object you're trying to find.
Use it to follow a chain of bright points, explore a large cluster, or sweep along the Milky Way under dark skies. Those activities reward a broad view more than a large image of a single small target.
At 774 g, it is the lightest option in this group, though your arms can still tire during overhead viewing. A reclining chair and supported elbows can make a longer session much easier.
It also has a tripod socket, so you can add support later with a separate adapter. That gives you room to change your observing habits without starting with a giant mounted pair.
Choose it for casual evenings, camping, and learning the sky. Skip it if your main goal is a closer view of small lunar features or a dedicated mounted astronomy setup.
Sogries 20x80 Astronomy: Best for alternative mounted setups

- 20x magnification
- 80 mm objective lenses
- BaK-4 prisms
- Tripod mount
An alternative for buyers committed to large, mounted astronomy binoculars. Confirm the supplied support hardware before planning the rest of your setup.
Pros
- Large objectives for astronomical viewing
- 17 mm eye relief
- Rubber-armored housing
Cons
- Heavy for prolonged handheld viewing
- Included tripod hardware needs confirmation
The Sogries 20x80 Astronomy is an alternative for buyers who have already settled on large, mounted binoculars. It offers the same basic magnification and aperture format as the larger SkyMaster, rather than a different way to observe.
BaK-4 prisms, rubber armor, and 17 mm eye relief are useful features to weigh. They don't establish that its view will match another model, since optical alignment and the complete optical design also affect comfort and clarity.
Sogries describes the housing as waterproof, but that claim isn't a reason to leave the binoculars outside through bad weather. Dew control and dry storage still matter for night use.
Confirm the included tripod hardware before buying, since the supplied accessory details aren't clear enough to plan a complete support setup. Don't assume the mount connection means a suitable full-height tripod is ready to use.
Consider it if you're comparing alternatives and can settle that hardware question first. Skip it if you want the clearest route to assembling your first astronomy setup.
How do you choose binoculars for stargazing?
Choose handling first, then magnification and aperture together. A pair that fits your observing habits will be more useful than a larger one that needs equipment you rarely want to carry.
What size binoculars for stargazing should you choose?
Choose a lower-power handheld format for short, flexible sessions and a larger mounted format for focused observations. Decide where you'll store the pair and how far you'll carry the whole setup before choosing its size.
Handheld binoculars let you move around a tree or building that blocks part of the sky. A tripod gives a steadier view, but moving it means stopping, lifting equipment, and finding a new position.
For a general explanation of power and handling, see our 8x42 versus 10x42 comparison. The same trade between image scale and visible shake applies when you move into astronomy formats.
How much do larger objectives help?
Larger objectives collect more light, which can help reveal faint targets under suitable conditions. They also add bulk, so the benefit needs to justify the equipment you'll use to support them.
Aperture doesn't turn a bright suburban sky into a dark rural one. Nearby lights and sky glow reduce contrast, especially for diffuse objects such as galaxies and nebulae.
If you can travel to a darker site, that change may help more than buying the largest pair. Check that a larger setup will fit the trips you actually plan to take.
What does exit pupil tell you?
Exit pupil describes the width of the light beam leaving each eyepiece. Divide objective diameter by magnification to find it, using millimeters for the objective measurement.
For example, a general 10x50 format has a 5 mm exit pupil. At the same aperture, increasing magnification makes that beam smaller and usually makes extended sky objects appear dimmer.
A very large exit pupil isn't always an advantage. If it is wider than your own pupil, your eye can't use all of the beam, so don't buy on this number alone.
How important are coatings and prism glass?
Coatings and prism glass matter, but they aren't a complete measure of the view. Lens coatings reduce reflections, while the prism system helps carry light through the binoculars to your eyes.
Don't rank two pairs solely by a glass label. Alignment, focus, stray light control, and comfortable eye placement all affect whether you can enjoy a long observation.
What should glasses wearers prioritize?
Enough usable eye relief comes before extra magnification if you need to keep glasses on. You should be able to see the field without pressing the glasses hard against the eyecups.
People with astigmatism may prefer to observe with their glasses, since a focus adjustment doesn't correct that condition. Our guide to binocular eye relief explains the fit issues to check.
What can you realistically see with astronomy binoculars?
Expect the most satisfying views from the Moon, broad star fields, and larger clusters. Binoculars add reach to your eyes, but they won't give the detailed planetary views or colorful deep-sky scenes seen in long-exposure photos.
Start with bright, easy targets
The Moon is a useful first target because it's easy to locate and focus on. Look near the line between lunar day and night, where shadows make surface features stand out.
Large clusters are another good starting point because they can fit naturally into a binocular field. Pick a few targets visible from your location and season rather than trying to find everything in one evening.
Match deep-sky expectations to the sky
Faint galaxies and nebulae often look like pale patches rather than detailed objects. A darker location, a clear night, and time for your eyes to adjust all help you notice them.
Let your eyes adapt before judging a faint target, and keep phone screens dim. Looking slightly beside a faint patch can sometimes make it easier to notice than staring straight at it.
Choose a telescope for planetary detail
A telescope is the better tool if your main goal is Saturn's rings or fine detail on Jupiter. Buying the highest-power binoculars here won't turn them into a planetary telescope.
Binoculars remain useful alongside one because they show broader areas of sky. Choose them for that strength rather than expecting one instrument to cover every kind of observation.
How do you set up astronomy binoculars for a comfortable view?
Set the fit and focus before chasing faint targets, then arrange your support so you can observe without straining your neck. Do the first setup in daylight, aimed at a distant land target well away from the Sun.
Fit the eyepieces to your eyes
Adjust the hinge until the two views merge into one round image. If you see overlapping circles or dark crescents, correct the spacing and eye position before turning the focus control.
Set the eyecups for use with or without glasses, then follow the model's instructions for focus and diopter adjustment. Our guide to focusing binoculars correctly explains how to balance the view between your eyes.
Recheck focus on a bright celestial target after dark. A distant daytime subject helps with preparation, but your final night focus still deserves a careful adjustment.
Choose support for the viewing angle
Check the load capacity of both the tripod legs and the head. The head must hold the binoculars at an upward angle without slowly slipping after you let go.
Tripod height matters because the eyepieces become harder to reach as you tilt toward overhead targets. Raising a center column all the way can increase wobble, so plan the viewing position before relying on extra height.
Straight-through binoculars can be awkward near the zenith on a standard photo tripod. A suitable chair or a different observing position can help, but don't force your neck into an uncomfortable angle.
Find targets before looking through the eyepieces
Locate the area with your unaided eyes first, then bring handheld binoculars into place while keeping your gaze fixed. With mounted binoculars, begin at a nearby bright reference point and move in small steps.
Use a sky chart to learn the pattern around the target rather than searching at random. At higher power, a small error in aim can put the object outside your field.
Which common mistakes make stargazing harder?
The biggest mistakes are buying too much magnification, ignoring support, and expecting bright photos through the eyepieces. Avoid those errors before spending time on small differences between models.
Holding heavy binoculars for the whole session
Arm fatigue adds shake and makes it harder to study faint details. Use a mount for giant models, and support your elbows or recline when using a handheld pair.
A brief steady look is more useful than several minutes of fighting movement. Take breaks instead of gripping harder as your arms tire.
Observing through a window
Window glass adds another surface between you and the sky, and warm indoor air can disturb the view through an open window. Move outside when you can and choose a spot away from heat rising off buildings.
Keep bright porch lights out of your direct view. Shade from a wall or a small change in position can improve comfort without moving to a new observing site.
Confusing focus problems with alignment problems
If the image stays doubled after careful fit and focus adjustments, stop straining to merge it. Optical alignment may need attention, and forcing your eyes to compensate can make viewing uncomfortable.
Don't attempt internal alignment adjustments as routine maintenance. Use the support or return options available for the binoculars instead.
Forgetting daytime safety
Never aim binoculars at the Sun, even briefly. Keep that rule in mind when setting up during daylight or scanning near sunset, since concentrated sunlight can cause permanent eye injury.
How do you protect binoculars from dew and dirt?
Keep the lenses dry, capped during transport, and free of loose grit before wiping. Night use brings dew and temperature changes, so care after a session matters as much as care in the field.
Handle dew without rubbing the lenses
Dew forms when exposed surfaces cool enough for moisture to condense. Water resistance doesn't stop moisture from forming on the outside of a lens.
If dew interrupts the view, pause and let the optics dry in a sheltered place. Avoid repeatedly wiping damp lenses, which can drag dust across the coating.
Let moisture escape before storage
After a damp session, allow the binoculars to dry before closing them in their case. A sealed case is useful for transport but a poor place to trap moisture.
Moving cold binoculars into a warm room can also cause condensation. Let them warm gradually in their case, then check for moisture before putting them away for longer storage.
Clean only when needed
Remove loose dust before using a lens cloth, and avoid cleaning clear lenses simply because a session has ended. Fingerprints and stuck dirt need more care than a quick dry rub.
Our guide to cleaning binoculars without scratching the lenses covers the order to follow. Keep the supplied cloth clean so it doesn't become a source of grit.
Which best binoculars for stargazing should you buy?
Choose the SkyMaster 15x70 for a first tripod-based astronomy setup or the Cometron 7x50 if easy handheld use will get you outside more often. That choice matters more than picking the highest score or the biggest front lenses.
Choose the SkyMaster 25x70 when you already know your targets and want more image scale. Pick the SkyMaster 20x80 for longer sessions from a fixed spot, or consider Sogries after confirming how it will fit your mount.
The best binoculars for stargazing are the ones you can aim, steady, and use comfortably for the observations you enjoy. If daytime walks will make up most of their use, compare the best binoculars for hiking before committing to a giant astronomy pair.
Our top 3 picks at a glance
-
1
-
2
-
3
Frequently asked questions
What magnification is best for stargazing binoculars?
Lower power is the easier starting point for handheld stargazing, while higher power suits mounted viewing of smaller targets. Choose around how you'll observe, rather than picking the largest number.
A steady, wide view helps beginners find objects; extra magnification helps only when you can hold the image still.
Are 10x50 binoculars good for stargazing?
Yes, 10x50 binoculars are a useful middle ground for stargazing, combining moderate magnification with objectives large enough for general sky viewing. They still need steady hands or support for longer sessions.
None of these picks uses that format, so consider it if you want something between broad scanning and mounted astronomy.
Do you need a tripod for astronomy binoculars?
You should plan on a tripod for the giant astronomy binoculars here, especially for extended observations. Lower-power binoculars are more practical by hand, though support still helps.
Check the load capacity of both the tripod and its head, then make sure the setup allows comfortable viewing above the horizon.
Can binoculars show planets?
Binoculars can show bright planets and may reveal Jupiter's brightest moons under suitable conditions, but detailed planetary views call for a telescope. Saturn's rings are not a sensible buying goal for these picks.
Choose astronomy binoculars mainly for lunar scenery, star fields, larger clusters, and learning your way around the sky.
Are bigger binoculars always better for astronomy?
No, bigger binoculars help only when their size fits your observing habits and support setup. Larger objectives gather more light, but extra weight can shorten sessions or keep the binoculars indoors.
For a beginner who wants quick handheld views, a smaller, lower-power pair can be the more useful choice.